Course Choices
The Student's Course Choices module in the curriculum aims to provide schools with an overview of courses chosen by students themselves. Schools will be able to manage the sets of courses they have sent out and keep track of students' choices, modify them, share courses with other schools and later add students to course journals.
Good to know!
The Course Choices module can also be used to enrol in extracurricular activities! To do this, the activities must be defined in the curriculum.
Defining the module in the study arrangements
When you start working with the eKool module, you need to set a few specifics.
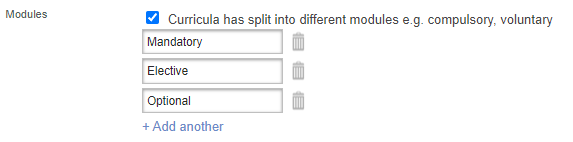
It is very important to create generic types for your school's courses. To do this, go to your school's eKool home page, select Classificatory and Learning Arrangements from the menu. Review and, if necessary, add to the module types of subjects taught.
Link to the eKool curriculum
Everything needs to be set up correctly in eKool before you can start working with the module.
Where to start:
- Setting up a school page so that a curriculum can be prepared
- Setting up a curriculum. Traditionally, the structure of the curriculum is based on the definition of subjects and courses under subject cards.
- Adding all the information on specific subject courses
Once all these steps have been taken, the whole curriculum should be reflected in the Course Choices module of the curriculum. In the list view, all the subjects and courses defined under the curriculum are displayed.
Attention!
Always make sure that everything in the eKool curriculum list is correct, because the Course Choices of curriculum subjects and courses are one to one, defined in the eKool Curriculum. If you want to make changes to a subject or course, you must do so in the Curriculum.
Working with the list of courses. Publishing
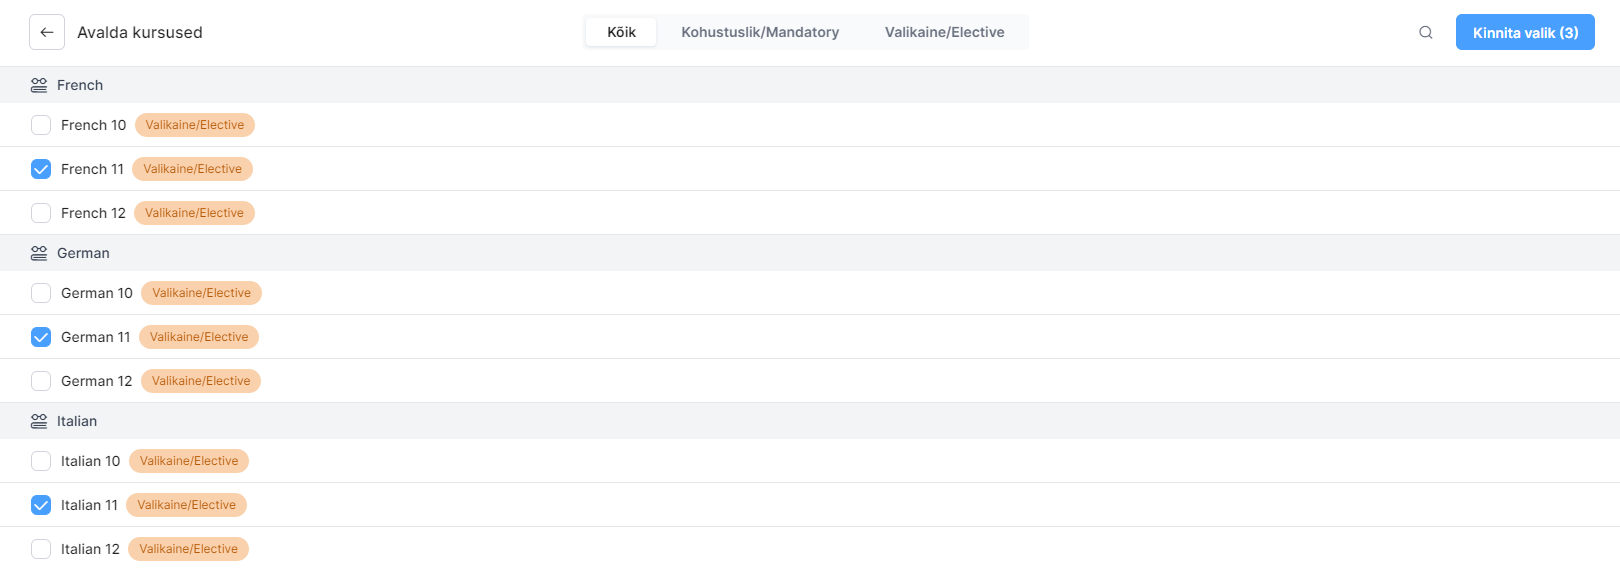
In order to publish a course selection, you need to select the courses from the list of Course Choices.
Example - a school wishes to publish that one of three courses should be chosen and completed by the student. Courses could be Spanish, German and French. All these courses are electives.
Good to know!
Subject types appear as filters in the list of courses and are only added to a course if they are specified in the Learning Arrangements. (The module is implemented from the eKool curriculum).
The previous example shows 3 courses that are marked as optional. Once you have made your selection, you must confirm it, which will take you to the course settings.
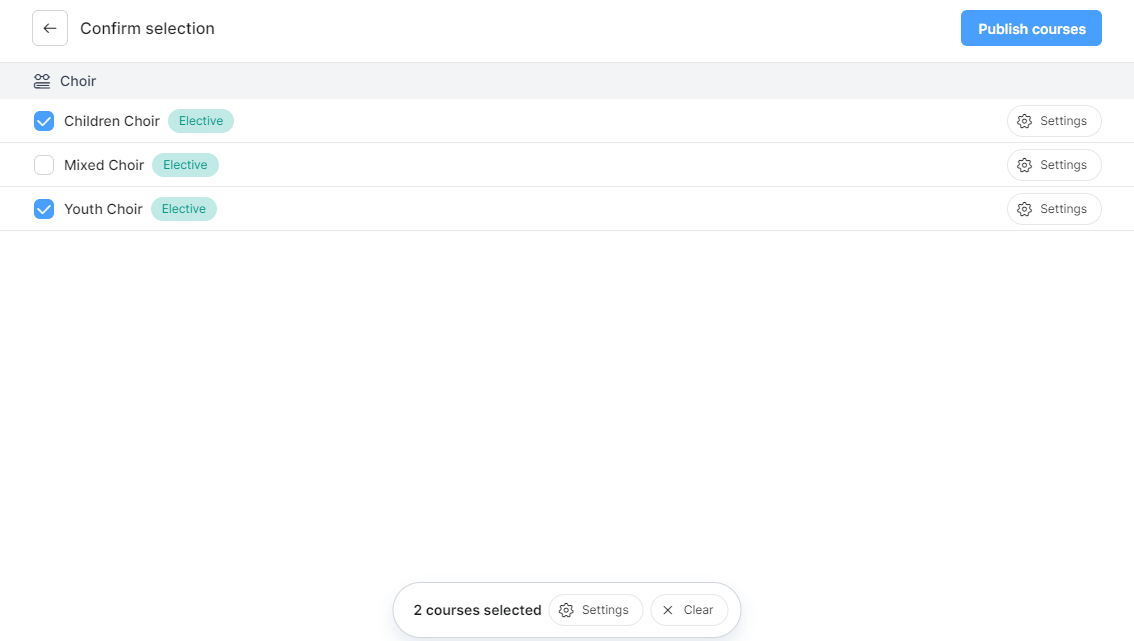
Before publishing all of these courses, settings must be applied to each course. Each course can be configured individually or, by putting a tick in front of the course names, several courses can be configured at the same time.
Here's an example of how to set up different school choirs.
Good to know!
The number of courses is shown below the screen to set up courses together. In addition, there is an option at the bottom to go immediately to configure courses or to clear the list.
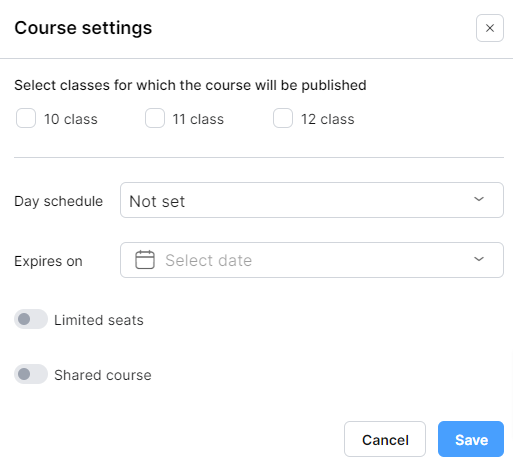
By clicking Settings, the school can set different types of information for each course in a specific set of courses:
- Class levels - specify the classes to which the course is open. (Class levels can be set, but courses cannot be routed to parallels separately).
- Course timetable (informative)
- Deadline- The end of the time within which students must make a choice. After the deadline, students can no longer make choices from the set.
- Unlimited number of seats - If there are no seats allocated, the course will default to an unlimited number of seats.
- Shared course - a course that is shared with other schools using eKool. The number of seats can be allocated to each school.

Once all the settings have been applied to each course, you can proceed to publish the course set to students.
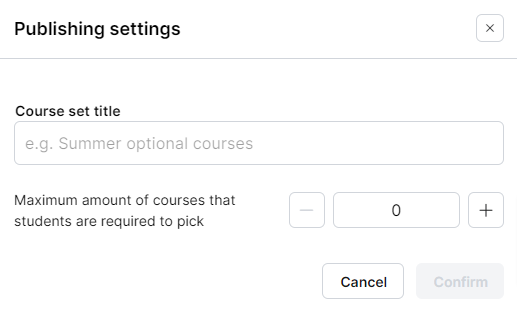
In the publishing overview, you need to define two things:
- Title of the set of courses (e.g. - Optional language courses for Semester II, 2023).
- Maximum number of courses - the number of courses a student has to choose from a set.
Good to know!
Determining the maximum number of courses that students can choose from is a very important detail that needs to be determined before publishing a set of courses.
Let's say that, as in our previous example with 3 electives, we publish all three and give students a choice. In reality, students will only be able to take one of these courses, as we can assume that all of them will take place at the same time. The maximum number of courses set by the school is 1, and students can only choose 1 course from the language courses in the example. If we, however, would like students to choose two courses out of three, then we set the maximum number of courses to 2. If students can choose all courses, then we set the maximum number of courses to the number of courses in the set - this is more for the purpose of getting an overview of the students' choices and then the student can assign to the journals.
In this case, in the publication settings window, it is specified that students can only choose one of the three courses. After specifying the title and the number of courses, I confirm the set.
The set of courses has now been published and can be seen in the Published course set view.
Attention!
Once a set of courses has been published, it cannot be changed backwards. If you have discovered an error, the entire set must be archived and re-compiled. Once archived, this set will no longer be displayed to students and they will not be able to select courses from this set.
Archiving cannot be undone!
Student overview for school
The most important part of the Course Choices is to ensure transparency about the choices made by students among the published set of courses. The student overview allows the school to monitor, manage, modify and assign choices. In addition, logs of all activities are visible to the school - who, when and what.
An overview of the students allows the school to see:
- Choices made
- Removed options
- Assign courses (in case the student does not make a selection)
- View activity logs for course selections made
It is always important that either the class teacher or the school administration makes sure that the student has chosen the course and that all the information appears to be correct. If all the data is correct and the students have made the choices or have been assigned courses - then there is no problem to add students to the journals based on the choices made by the students.

List of registered and waiting list
Registered students can be seen by opening the published set of courses and hovering over the selected course. Additional options will be displayed (see details, waiting list and registered).

Clicking on Registered will bring up a list of students who have selected this course. If a course is published for more than one class, you can click on the arrow to view the registered students in the different classes. In this view you can see the total number of registered students.
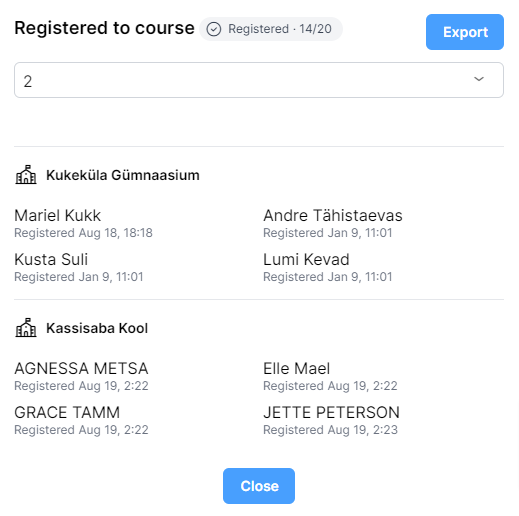
Exporting the list of registered students
It is possible to export the list of registered students from eKool. To do this, you need to open the list and press the Export button. After pressing the button, the enrolled-list.cvs file will be saved on your computer. You can change the name of the list file on your computer.
Waiting list
Students have the possibility to join the waiting list if the course published for them has exceeded the limited number of seats.
The waiting list is only available for courses with restrictions. The waiting list is static information and there is no automatic process in the background. Schools will be able to see a list of students who have requested to register for a course where places are already full. With the list, schools can act as they wish - take note that more places are needed for certain courses next year; can add students to courses where a student has wished to leave the main list, or the person responsible for the courses can remove students from the main list and assign someone to a course from the waiting list.
Good to know!
No systematic approach has been included in the case of limited sites. The concept is simple - whoever chooses first gets a place to study the course.
Later on, the person in charge of the course can remove students from the course and assign other students to the list.
The waiting list can be viewed by clicking on a set of courses and hovering over the course and clicking on Waiting List.

Exporting the waiting list
It is possible to export the waiting list from eKool. To do this, you need to open the list and press the Export button. After pressing the button, the waiting-list.cvs file will be saved on your computer. You can change the name of the list file on your computer.
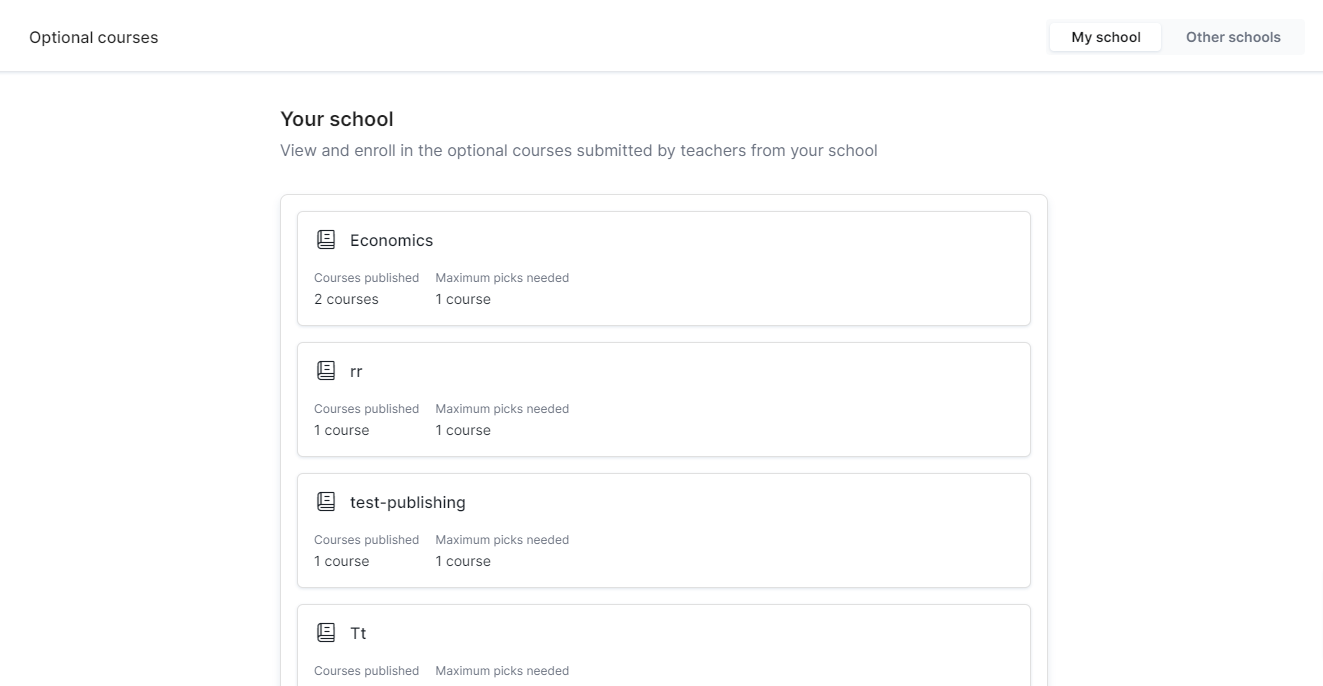
A view for students on their choices
Students have their own view of the Course Choices module. Students will be able to view all the published course sets and make course selections according to the settings set by the school.
Students will be able to see courses from their own school and from other schools that have shared with their home school.
In this example, there are 2 sets published for students and the maximum number of courses a student must choose within a set of courses is shown. Once the student selects the maximum number of courses, the other courses in the set are no longer active for the student to register. However, the student will be able to change his/her selection. To do this, the student should withdraw from one of the registered courses and the student will then be able to change the course, of course only if there are still places available in the new course they want and the registration deadline for that course has not passed.
Registration for courses at other schools is the same as for home school courses.
All the choices made by the students are reflected in the school's Student Overview. Even if the student has not yet made his/her choices.
Good to know!
When a school archives a set of courses, the set is no longer displayed to students.
Students in the journal
One of the most important features is the automatic import of students into the correct journals. The Course Choices module provides the possibility to import all the choices made by students, either by students from your own school or by students from a shared school, i.e. the journal view shows all the students who have chosen this course.
Connections!
All the journals are linked to the courses, as are all the course sets in the Course Choices module linked to the courses in the curriculum. For example, if you create a journal with a course tag such as Astronomy, you can select students for the journal who are registered for the course Astronomy.
Location of the button in the eKool journal:
Located in the lower part of the journal page.

Attention!
Make sure you use the correct Pick students from course choices button, as only this button will give you a list of students who have selected this course. The second button Pick students will show all the students and classes in the school, it does NOT SHOW the students who have selected this course.
View the list of students registered for a course.
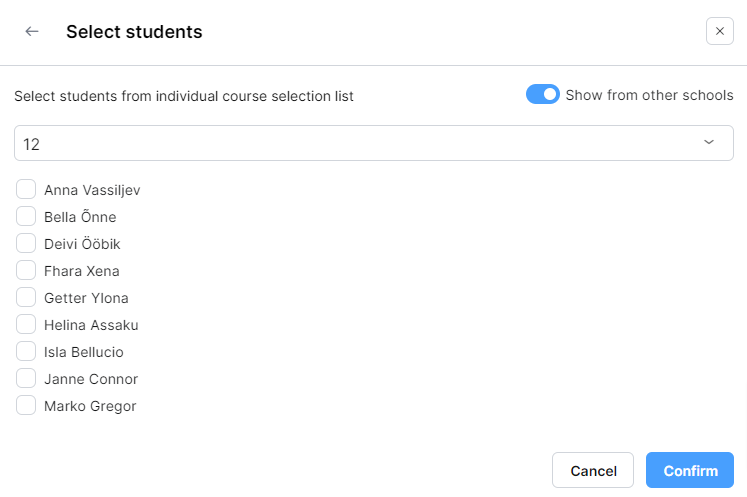
This list does not show the whole class, only the students who have chosen this course or who have been manually assigned it by the school.